You can make yourself a LoRa-WAN gateway using a Raspberry Pi Model B+ and a LoRa concentrator board RAK831.
TTN LoRaWAN gateway based on Raspberry Pi Model B+ and the RAK831 concentrator board.
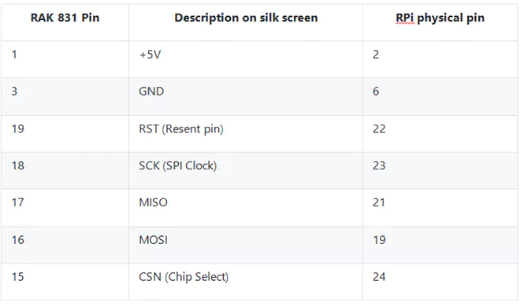
Make these connections:

- Download raspbian_stretch_lite: http://director.downloads.raspberrypi.org/raspbian_lite/images/raspbian_lite-2018-04-19/2018-04-18-raspbian-stretch-lite.zip
- Unzip and write image file to 4Gb micro SD-card using Etcher (https://etcher.io/).
- Within /boot directory create a new file ssh (without extension). This will activate ssh during first boot.
- Start up Raspberry. Default username/op: pi/raspberry.
- Look up the Raspberry’s IP-adres by using advanced-ip-scanner (http://www.advanced-ip-scanner.com/nl/).
- Install putty on your PC: https://www.chiark.greenend.org.uk/~sgtatham/putty/latest.html and create a shortcut to putty.exe on your desktop.
- Open putty.exe and in the Host Name field fill in Raspberry’s IP-address (see step 6, in my case 192.168.2.6).
- Type passwd to change the default password.
- Type sudo raspi-config (you can past this to Putty using the right mouse button).
- Select 5 Interfacing Options > P4 SPI and select ‘Yes’.
- Select 7 Advanced Options > A1 Expand Filesystem and choose <Select> using the Tab-button).
- Select <Finish> and reboot.
- Use putty to contact via SSH again and check if SPI is enabled: ls /dev/*spi*
Raspberry’s response: /dev/spidev0.0 /dev/spidev0.1 - Update, upgrade and install git: sudo apt-get update && sudo apt-get upgrade && sudo apt-get install git -y
- Install TTN software: git clone https://github.com/ttn-zh/ic880a-gateway.git ~/ic880a-gateway
- Open this new directory: cd ic880a-gateway
- Ask for Gateway EUI: sudo ./install.sh spi
Stop here and copy the given EUI code (for example: B827EBFFFED8B28D). - Register your gateway on TTN: https://www.thethingsnetwork.org/
- Gateway EUI: fill in EUI code (see step 18)
- I’m using the legacy packet forwarder: Yes
- Description: choose your own
- Frequency Plan: Europe 868MHz
- Via SSH: Do you want to use remote settings file: N
- Fill in:
- Gateway EUI: fill in EUI code (see step 18)
- Descriptive name: see step 19
- Contact email: your e-mail address
- Latitude: copy this from TTN
- Longitude: copy this from TTN
- Altitude: copy this from TTN
- After a few minutes the Raspberry will reboot and your gateway is on line!
- Shutdown Raspberry: sudo shutdown
To prevent the SD-card getting corrupted you could add a button to shutdown the Raspberry Pi safely.
Open Terminal (via SSH or local) and type:
cd
mkdir Scripts
cd Scripts
touch shutdown_pi.py
Edit python script:
nano shutdown_pi.py
Type the script content:
#!/bin/python
# Simple script for shutting down the raspberry Pi at the press of a button.
# by Inderpreet Singh
import RPi.GPIO as GPIO
import time
import os
# Use the Broadcom SOC Pin numbers
# Setup the Pin with Internal pullups enabled and PIN in reading mode
GPIO.setmode(GPIO.BCM)
GPIO.setup(18, GPIO.IN, pull_up_down = GPIO.PUD_UP)
# Our function on what to do when the button is pressed
def Shutdown(channel):
os.system(“sudo shutdown -h now”)
# Add our function to execute when the button pressed event happens
GPIO.add_event_detect(18, GPIO.FALLING, callback = Shutdown, bouncetime = 2000)
# Now wait!
while 1:
time.sleep(1)
Save file by pressing CTRL+X, type y and Enter.
Connect a push button between Raspberries GND and GPIO18 (Pin 12 and 14).
Test the the python script:
sudo python shutdown_pi.py
Add python script to startup:
sudo nano /etc/rc.local
Add after fi:
python /home/pi/Scripts/shutdown_pi.py
Save file by pressing CTRL+X, type y and Enter.
Reboot:
sudo reboot
Removing power source to fast may lead to data corruption.
Connect LED (with 470 Ohm resistor in series) between Pin 6 (GND) and Pin 8 (TXD) of the Raspberry Pi.
Only when the LED is out it’s safe to remove power source.
Connect Raspberry Pin 5 to ground.
Total boot time (from idle): 50 s.
Just add a 3G dongle to the Raspberry Pi. Be aware of the rather high power consumption of the 3G connection. Better use a powered USB-hub.